How to Transfer Contacts from Android to iPhone? (Helpful Step-by-Step Guide)
Switching from an Android device to an iPhone is exciting, but one of the biggest concerns users have been transferring their contacts. Luckily, Apple provides several easy methods and solves your problem of how to transfer contacts from android to iPhone without losing important data.
In this guide, we’ll walk you through different methods, including using Move to iOS, Google sync, and manual transfer options.
Still wondering if switching to iPhone is the right choice? Check out our detailed iPhone vs. Android comparison to help you decide.
Why Transfer Contacts from Android to iPhone?
When upgrading to an iPhone, you don’t want to lose your important phone numbers, emails, and contact details. Since Android and iOS use different systems, manually entering each contact is time-consuming. Instead, using automated transfer methods makes the process fast and efficient.
Best Methods to Transfer Contacts from Android to iPhone
There are multiple ways to transfer contacts from Android to iPhone based on your preferences. Below are the most effective methods:
| Method | Requires Internet? | Ease of Use | Best For |
| Move to iOS App | Yes | ⭐⭐⭐⭐ | Users setting up a new iPhone |
| Google Account Sync | Yes | ⭐⭐⭐⭐ | Those who use Google services |
| SIM Card Transfer | No | ⭐⭐⭐ | Limited contacts, no emails/images |
| vCard (.VCF) Transfer | Yes | ⭐⭐⭐ | Manual contact export/import |
| Third-Party Apps | Yes | ⭐⭐⭐⭐ | Advanced users who prefer apps |
Now, let’s dive into each method in detail.
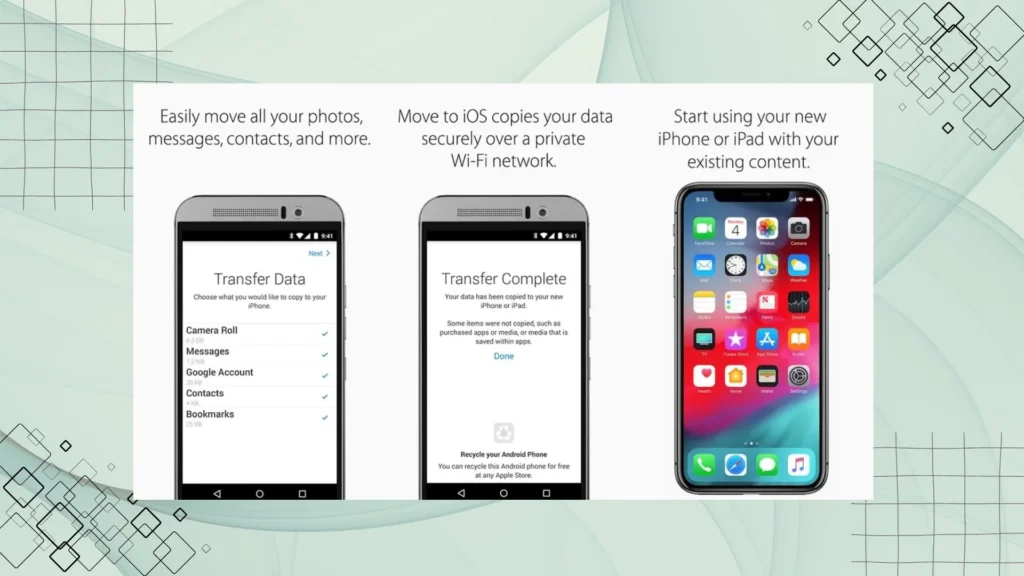
1. Transfer Contacts via Move to iOS (Best for New iPhones)
Apple’s Move to iOS app is designed to help Android users transfer data, including contacts, to a new iPhone.
Steps to Transfer Contacts Using Move to iOS:
- Download Move to iOS – Install the Move to iOS app from the Google Play Store on your Android device.
- Start iPhone Setup – Turn on your new iPhone, and on the “Apps & Data” screen, select “Move Data from Android.”
- Connect to Wi-Fi – Ensure both devices are connected to the same Wi-Fi network.
- Enter Code – Your iPhone will show a code. Enter this on your Android phone to pair the devices.
- Select Data to Transfer – Choose “Contacts” and other data like messages, photos, and accounts.
- Wait for Transfer – Let the process complete, then continue setting up your iPhone.
✅ Best for: Those setting up a new iPhone and want to transfer multiple types of data at once.
2. Sync Contacts Using Google Account (Fast & Easy)
If you use a Google account on your Android, you can quickly sync contacts to your iPhone.
Steps to Sync Contacts with Google:
- On Android:
- Go to Settings > Accounts > Google.
- Select your Google account and enable Contacts Sync.
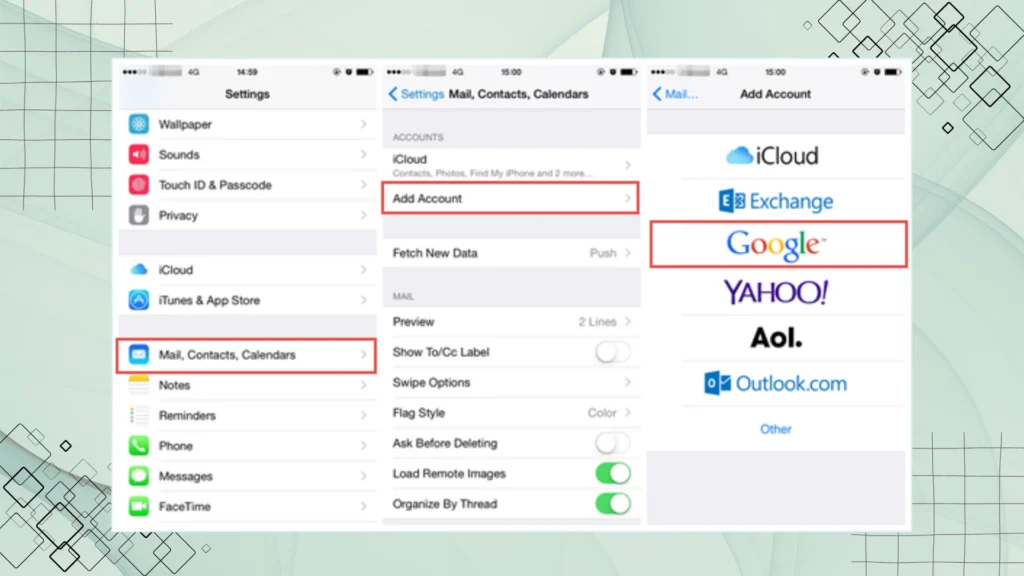
- On iPhone:
- Open Settings > Mail > Accounts.
- Tap “Add Account” and select Google.
- Sign in with the same Google account and enable Contacts Sync.
- Contacts will appear in the iPhone’s Contacts app.
✅ Best for: Users who already sync contacts with Google and want a quick, automatic transfer.
3. Transfer Contacts Using SIM Card (Offline Method)
This method is useful if your contacts are saved on your SIM card instead of Google.
Steps to Transfer Contacts via SIM Card:
- On Android:
- Go to Contacts > Import/Export > Export to SIM card.
- Insert the SIM Card into iPhone:
- Remove the SIM from Android and insert it into the iPhone’s SIM tray.
- On iPhone:
- Go to Settings > Contacts > Import SIM Contacts.
✅ Best for: Users with fewer contacts and no internet access.
❌ Limitations: Only transfers basic contact details (no images, emails, or extra information).
4. Transfer Contacts Using vCard (.VCF) File
This is a manual but effective way to transfer contacts from Android to iPhone.
Steps to Transfer Contacts Using vCard:
- On Android:
- Open Contacts > Settings > Export Contacts as a .VCF file.
- Email the .VCF file to yourself.
- On iPhone:
- Open the email and download the .VCF file.
- Tap the file, then select “Add All Contacts.”
✅ Best for: Users who prefer manual control and want to store contacts offline.
5. Use Third-Party Apps for Contact Transfer
Several third-party apps make transferring contacts easy. Some popular ones include:
- Copy My Data
- My Contacts Backup
Steps to Transfer Contacts Using an App:
- Download a contact transfer app on both devices.
- Follow the in-app instructions to sync contacts.
- Import the contacts to your iPhone.
✅ Best for: Users who need additional features like contact merging or backing up to cloud storage.
Planning to upgrade? See how the latest iPhone 16 compares to iPhone 15 before making a decision.
Common Issues When Transferring Contacts & How to Fix Them
While moving contacts from Android to iPhone is usually smooth, some users face issues like missing contacts, duplicate entries, or incomplete transfers. Here are the most common problems and their solutions.
1. Contacts Are Not Syncing Properly
Sometimes, contacts don’t appear on the iPhone after the transfer. This can happen due to disabled sync settings or an unstable internet connection.
Fix: Ensure that Google Contacts Sync is enabled on your iPhone:
➡️ Go to Settings > Mail > Accounts > Add Account > Google, then enable Contacts Sync.
2. Duplicate Contacts After Transfer
If you see the same contact multiple times, it’s usually because contacts from Google, SIM cards, and device storage all got transferred separately.
Fix: Use the built-in Contacts Merge feature on iPhone:
➡️ Open Contacts > Select a Contact > Edit > Link Contacts, then merge duplicates.
3. Some Contacts Are Missing After Transfer
Contacts stored only on the SIM card may not transfer automatically. Also, if you used an app, it might have skipped some entries.
Fix: Export contacts from Android as a .VCF file, then manually import them into iCloud via a computer.
4. Contacts Transferred But Not Showing in iPhone Contacts App
If contacts are transferred but not visible, they might be saved in a different account (Google, iCloud, or Outlook).
Fix: Go to Settings > Contacts > Accounts, check which account is set as default, and switch if necessary.
5. Error Message During Transfer Using an App
Some third-party apps might fail due to app permissions, outdated versions, or storage issues.
Fix: Restart both devices, update the app, and check for necessary permissions in Android settings under Apps > [App Name] > Permissions.
FAQs
Final Thoughts: Which Method Should You Use?
The best way to transfer contacts from Android to iPhone depends on your situation:
- Move to iOS – Best for new iPhone users.
- Google Sync – Best for quick & automatic transfer.
- SIM Card Transfer – Best for offline users.
- vCard Transfer – Best for manual control & backup.
- Third-Party Apps – Best for advanced users.
By following these steps, you can easily sync your contacts and start using your iPhone without losing any important data.